


For my Advanced Level Design class, I decided that I would create a map for one of my favorite games - Portal 2. I have played the game multiple times, struggling through all of the main story’s puzzles and the community-made puzzles that can be found in the Steam Workshop. I wanted to see what developing these maps were like, so I jumped right into the Hammer editor and got myself started. It was a long and rather exhausting process, but I believe that learning about how maps within Team Fortress, Portal, and Left 4 Dead are made is a fun skill to have, as it would allow me and other people to join Source modding communities and create cool content that would keep these old games alive. So today, I am going to tell you the process that you need to go through to create a decent looking map and some tips about using the Hammer editor. Keep in mind, I am going to talk about Hammer from the perspective of developing a map for Portal 2, but most of the content within this post should be usable across all Source games.
If you did not know beforehand, Valve is a game development and distribution company founded in 1966. The company created the Goldsrc ( pronounces go-ld- so-horse) engine, using the Quake engine as grounds to do so, and used Goldsrc to create games such as Half-Life. The Source engine is the successor to the now outdated Goldsrc engine, and has been used to develop games from 2004 and onward, such as Counter-Strike, Half-life 2, and Portal! Hammer makes games specifically for the Source Engine, and is the main tool used by the developers at Valve to create the maps that you see within Source games. The Portal 2 Authoring Tools ( the tool that we will be using to create our map) is a version of Hammer that has been edited to be used directly with Portal 2, hosting most, if not all, of the content seen within both Portal and Portal 2, but also automatically applies behaviors to some of the contents of the map for you and allows you to compile your map straight to the games map folder.
With that out of the way, let us get straight into the tutorial!
1. Get The Map Editor
The first thing that you need to do is to download the Portal 2 Authoring Tool. You will need to download Portal 2 to gain access to the tool, which will be under your tools tab in your Steam game library. Portal 2 costs 10 bucks; it’s cheap. If that’s too much though, you can always wait until a sale is happening or ask a friend if they can share their library with you. No matter what, you’ll need to gain access to Portal 2 to use the Portal 2 Authoring Tool.
The Portal 2 Authoring Tool provides all the tools that the developers of Portal 2 used to create the maps of the main game. Well, everything and a bit more - some of the content that you can use is not present within the main game and you can create your content that can be loaded up into the game. With the current version of the tool you can do a lot, but it has not been updated since 2009, so it is rather outdated. This means that tools that you would expect out of today's engines are either not present within this tool, or is not as refined as you would want it to be. For example, you do not have a list of the entities that you used within the map, so you would have to either…
- Use a point file(explained later) to find where an object is
- Use the XYZ coordinates found within the console and type those coordinates in so that you can get to the area of that object
- Search the entire scene for that object
It does not sound bad at first, but as you continue using the tool, you will see how tedious it is to do that and some other basic tasks. In other words, go in expecting to learn/relearn a few things. However, if you are pretty skilled with using the tool, you could edit how some of the assets work to create custom mechanics, music, events, or even a campaign. This tutorial, however, will only cover most of the basics of Hammer.
2. Play The Game
You can skip this step if you have already played Portal or Portal 2. Before we get into the conceptualization of the map, we need to experience the game to understand its design theory. While playing, pay attention to these things:
- How each puzzle works
- The texturing of each map/how the map looks in certain areas.
- Mechanics/characters/events/areas/music that are available at different parts of the game.
Paying attention to these aspects of Portal 2 will help you develop the proper mindset so that your maps can be consistent with the themes and rules within Portal while still being interesting and unique. Would you want to play a map with a turret cube inside Old Aperture, or a map with a Wheatley Screen but with Glados being shown on that screen? Maybe you do, and maybe it’ll work! But, but if you want to make a consistent map, you would need it to make sense thematically.
After you’re done playing the game once or twice, I would recommend that you try out the developer's commentary. The developers' commentary goes into depth about the design choices that were used during each part of the game, and the experiences that the developer had while developing and working with other developers. The commentary is not only very insightful but also very useful in developing new ideas that you can use within your map that stays consistent with the theme of Portal. Check it out!
3. Conceptualize the map
With what you have learned from playing the game, think about how you can take elements from it and create your custom puzzle from it. Get something to draw on - physical or digital - and draw it all out. This will be a physical representation of how your map is supposed to look and play like - a papermap.
There are many ways to design a paper map, but while doing so, make sure to create an easy to understand key that represents the different parts of the map. How this key will look is up to you, but color coding is my recommended way of doing it. This is because a person can associate a color with a mechanic or feature. For example, different kinds of terrain ( fall-through terrain, swimmable terrain, and/or flat terrain, for example) can and should have a distinct color.
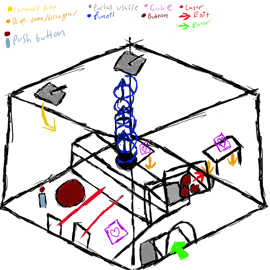
For Example, take a look at the papermap that I made. For my papermap, I used different kinds of colors to define different parts of my puzzle, but I also used shapes to do it too.enemies that the player will encounter within the puzzle.
For my paper map, I used...
- Dark Red: Buttons that the player can press/interact with
- Purple: Collectibles that the player can lift up
- Light Red: Lasers or danger areas within the map
- Yellow: Places where things will drop forward
- Orange: Places where things will drop down
- Blue: The place and direction that the excursion funnel will go in
- Green Arrow: Where the player will enter the map
- Red Arrow: Where the player will exit the map
- Black: edges of a platform
- Grey: Areas where portals can be placed in
- An isometric view: mostly to capture the entire shape and feel of the map, and to have a better understanding of where elements will be placed.
Now, this is a good time to state what you should not do when creating a papermap, because, while this map did help me get far in development, it can be confusing to people who are not me.
Do not…
- Use one color for multiple mechanics within your map: It just ends up confusing people about which is what and will end up confusing you when you need to figure out what to place down for a specific part of the puzzle.
- Try to make this map look like an art piece: It is supposed to simply communicate how the map is supposed to work and where things will be placed. If you want to make this look pretty, then good on you. Who knows, maybe you could use this pretty map for something special, like advertising. However, it is not necessary, and, if you do not know how to draw, then it could end up conflicting with the overall message that you are trying to send with your paper map.
- Make a paper map without understanding the games' mechanics: In my paper map, I made a segment where you would have to place a portal on a moving white platform, and use it to pick up items that are inaccessible to the player. That does not work within the mechanics and physics of Portal - a portal can not exist on a moving platform so that a portion of the puzzle did not make sense. As redundant as this is, I need to stress to you the importance of understanding the game that you are making a map for so that you can avoid what happened to me and make proper segments of your map.
I’m not done yet, so come back to my next post so I can teach you about the other steps you need to take to create your paper map! Until then, catch you later!
Visit www.uat.edu for more information on our Game Suite of Degrees in Game Art & Animation, Game Design and Game Programming.


Comment